After Effects Reflections
- Garth Lee
- Aug 24, 2017
- 3 min read
Updated: Jun 14, 2021
After Effects is many different things for many people, for some it's a powerful motion graphics tool, to others it's an intuitive character animation program. One thing it isn't though, is a high end 3D program. After Effects certainly has it's limits when it comes to 3D, after all, it's only recently that you've been able to manipulate 3D objects within After Effects itself.
Through years of creating explainer videos and animating screens in 3D space within After Effects, I realised a major thing was missing if I wanted to get these screens to a basic level of realism, without diving into a 3D program… and that was REFLECTIONS. It's simple, screens look far more realistic when they're shiny. Now I'm not talking about a crude white rectangle sweeping across the surface of your screen, roughly calculated by eye to move at a realistic speed. I'm talking about REALISTIC reflections that move automatically with your camera and rotation of your screen. The method is incredibly simple, but the outcome takes your screens from flat, to realistic with not much work at all. And the best thing is, once it's set up, you don't need to worry about animating your reflection, it all happens automatically.
Here's a (shameless self-promoting) render of my website both with, and without my reflection technique:
Understanding how reflections work was key to the theory behind this method.
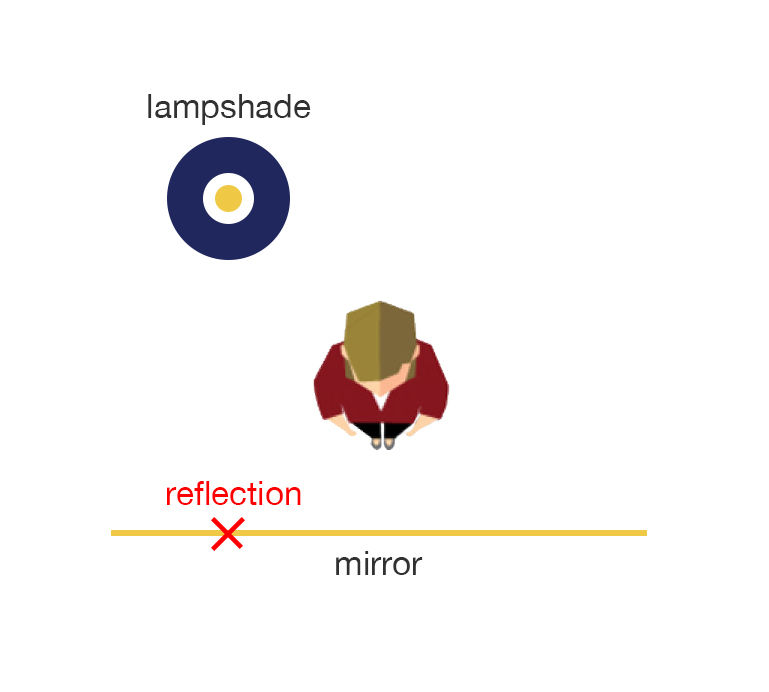
Imagine you're standing in front of a large mirror, behind and to your right is a lampshade. If you were to point to where the reflection of the lampshade is, you'd likely point to the mirror, right on the surface of the reflective surface. This is where you'd likely place your reflection or shine layer in After Effects.

However, if you think of the mirror as a window into a room that's identical but opposite to the room you're stood in, then the lampshades reflection is no longer on the mirror, but sits in the room on the other side of the wall. The lampshade now resides in a position that's the same distance from the wall as the lampshade in the room you're stood in, just in the opposite direction. It's this understanding of reflections that helped me develop the method behind After Effects Reflections.

Taking the previous example into consideration, it's now easy to see how this set up would work within After Effects. In front of your camera would be your surface layer, and beyond that would be your reflection layer:

The problem with this however, is that our reflection layer sits behind our surface layer in 3D space, resulting in it being completely obscured. The fix for this is simple, and one you may have come across in the past by accident, and that is the ADJUSTMENT LAYER. Adjustment layers force all layers above it in the hierarchy, to appear in front of all layers beneath it, regardless of their position in 3D space. You can use this quirk to your advantage to create awesome reflections.
Below is the layer ordering from the video example earlier in this post. Starting from the bottom, we have our screen, (in my case it's an image from my website). Above that is an Adjustment layer, this acts as our separator layer which forces all layers behind it in 3D space, to appear in front. Above that is our reflection image which is following the Alpha channel of a duplicate layer of the screen above it (this is to ensure the reflection doesn't go beyond the edges of the screen). Simply set this layer to 'screen' overlay mode, and set the opacity to your liking. Finally, the camera layer sits at the top.

Since everything sits in 3D space, all you have to do now is move your camera, and voila… realistic reflections! The great thing is, because your reflection layer sits behind your screen, it also acts realistically to depth-of-field.
The last thing you can do if you intend on animating the position / rotation of your screen, is parent the reflection layer to the screen layer. This will ensure that the reflections move naturally both with the movement of your camera, AND the movement of your screen.
Obviously, this is the simplest example of this technique, but you can apply the method to many different projects, not just simple animating screen shots.
Garth


Comments